How to Restore Windows to a Previous Date? Windows 7, 8, & 10
Table of Contents
Microsoft always try to bring newer and better versions of Windows through its updates. But sometimes the latest version may not function as smoothly as expected because of some unidentified bugs or compatibility issues. This could hamper your day-to-day operations and you might wonder that you shouldn’t have updated. Or there might be an update pending and you have heard about these cool features in the new update but you are anxious that the new update may slow down your computer.
Well, you don’t need to worry as “Windows System Restore” can help you restore windows to a previous date. Here, we will take you out of the woods and show you how to restore Windows to a Previous Date.
After reading this article and following the steps as mentioned, you would be able to restore your Windows to its older state as on a specific date before you updated it to the current version.
- Returning Windows to a previous state can help you weed out sluggish PC performance.
- Nail down software errors that started after the update.
- Resolve any driver errors that causes hardware failure or software crash.
If you want to restore Windows to a previous date, you must have a Restore point available from that date. Restore points are created by System Restore, only if they are enabled in the first place. So let’s learn how to enable them.
How to Enable System Restore?
For most computers, System Restore function is turned on by default. However, it is not so in Windows 10 and it might not be turned on for your computer. So you must enable it, if you want to have the option of restoring your system to a previous date.
Steps on on how to create and turn on system restore, and enable it for specific drives:
- Go to the Start menu and type ‘Restore’.
- A list of results would come up, click on the result that says ‘Create a restore point’.
- System Properties Window will open, now navigate to the System Protection
- In the ‘Protection Settings’ section, you’ll see the status of protection enabled for all the drives available on your PC. To protect a drive through Restore, select it and click the Configure
- You can choose any drive but it would be wise to choose C:\ drive (If that’s your system drive) as it stores the crucial operating system and application files.
- Click on the Configure button after selecting the drive and then click on the ‘Turn on System Protection’ option. By adjusting the ‘Max Usage’ slider, you restrict the amount of space the System Restore can use from your Hard Disk.
- Now you have to press the Apply button and then press OK.
- Now again you’ll have System Properties Window before you, Press OK.
Your System Restore is enabled now and it will create a Restore point on all the drives that you select. You can fall back to this or later versions of your system if you face problems anytime in the future.
Microsoft System Restore automatically creates Restore points once a week or before a major system change. But you should do it yourself too before you install a program or when you Update Windows Drivers.
Restore Windows to a Previous Date in Safe Mode
A faulty program or some driver inconsistency can prevent the System Restore from proper functioning. Luckily, Windows provides a Safe Mode too. It scans the system to check anything suspicious which could create a problem. Using System Restore in Safe Mode is real easy.
- Go to the Start menu and type ‘Change Advanced Startup options’.
- Select the topmost result and a new window will open, where you need to go to the ‘Advanced Startup’ tab and click ‘Restart Now’.
- Now, when your PC restarts, click ‘Troubleshoot’ and then go to the ‘Advanced Options’ further select System Restore. Now you can run System restore normal way.
Key Points before you Restore Windows to an Earlier Date
A few things that must be taken care of before restoring Windows to a previous date to avoid data loss.
- Any user accounts that were created prior the restore point will be deleted.
- Restoring does not uninstall or completely removes programs installed before the restore date. (Use Windows Add or Remove feature to completely remove the program)
- Remember, once you disable the Windows System Restore Feature, all the restore points created manually or automatically will be deleted.
- Make sure to back up the files that you are working on and close the apps before performing a system restore.
- Closing the program, you are working on act as an extra safety measure as doing so will require you to save the progress, thus it protects your data and saves apps from abrupt shut down by the reboot.
How does System Restore affect Personal Files and Apps?
System restore affects only the window’s system files. It has nothing to do with the rest of the data stored, it doesn’t work like backups. System Restore neither saves personal files nor deletes them when you restore Windows to a previous date . If you want to protect your personal files then you should do a proper backup.
However, System restore does affect the installed apps as apps are generally saved in the system drive. So if you restore you Windows, all the apps that you have installed after the date of creating that particular restore will not function. The apps that have been updated while this period will also be restored to their previous versions as they were before creating the restore point.
After restoration, you would need to reinstall the uninstalled apps, and would also need to update the others. You will be able to see the list of apps that are going to get affected when you restore Windows to a previous date.
How to Perform a System Restore in Windows 10?
Now, that you have learned to enable and create System Restore points and you also know how to run System Restore in safe mode, we can finally move on to learn how to perform a system restore in Windows 10 from the restore points. Follow the steps given below:
- Go to the Start menu and using the Run command open Run window.
- Type cpl and press the Enter key.
- The System Properties window will open up. There are multiple tabs in this window, go to the System Protection
- You’ll see an option labelled ‘System Restore’ from here, make sure that protection for at least system drive is turned on. You can find it under Protection Settings
- Now, the System Restore Wizard opens up. Click on Next, you’ll see all recent restore points.
- If you have recently created a restore point then you’ll get the option to ‘Undo System Restore’ and ‘Choose a different restore point’. Select the one and then click the Next.
- If you select ‘Choose a different restore point’ then you’ll see a list of Restore points and in case, all the Restore points are not visible then select the checkbox ‘Show more restore points’ and click Next.
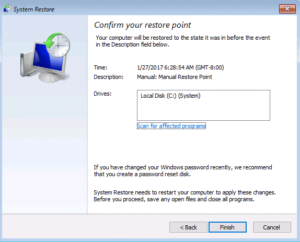
- Now select the restore point of the date to when you want to restore the windows and then click on the ‘Scan for affected programs’. Now you’ll be able to see all the programs and drivers that will be erased on using the restore point.
- You can reinstall and update these drivers and programs after the restore. But you should know which programs will be uninstalled or restored to a previous version.
- Now select the restore point from the date you want to restore to and then click on Next.
- Select Finish to restore Windows to a previous date .
Your PC reboots to initiate the restoration and it might take a while depending on the amount of data to be processed and when it’s done you will see a message on your display ‘System Restore completed successfully’. And this is how you restore Windows 10 to a previous date.
How to Perform a System Restore in Windows 8?
There are some minor differences among different versions of windows as far as exact steps are concerned but more or less, they follow the same pattern. A step-wise guide on how to perform a system restore in Windows 8 is as follows:
- Open Start menu and type ‘restore’. Out of the options, select ‘Create a restore point’.
- Now a System Properties window will appear, go to the System Restore section and then click on the System Restore.
- On the next window click Next and then ‘Show more restore points’ option to look for the restore point created on the date you want to restore it to.
- Choose the restore point, mark it and then click Next.
- After choosing to Confirm on the selected restore point, click Finish.
System restore will initiate and will take about 15-20 minutes or more depending on the volume of data it restores. Your PC might reboot a few times but don’t worry after the final reboot you have successfully restored your windows 8 to an earlier point in time.
How to Perform a System Restore in Windows 7?
In Windows 7, the process to restore is more or less similar. Here’s how to perform a system restore in Windows 7:
- Go to the Start menu and then type ’System restore’ using your keyboard and then press Enter.
- The System Restore Window would open from where, press Next.
- Now click the ‘Show more restore points’ option and then look for the restore point created on the date you want to restore it to.
- Choose the restore point, mark it and then press the Next
- After pressing Confirm on the selected restore point, click on the Finish
This action will start restoring Windows 7 to an earlier point and as usual the time it will take completely depends on the amount of data it requires to process.
System Restore to tackle malware
One might wonder restoring my computer to yesterday can tackle recent malware or virus attacks, but in fact, it might not help much. Malware can be spread around to all drive of your computer and can be present within any folders, System restore doesn’t even care to check your whole PC so it is not an efficient way to deal with such malicious infections. You must scan your PC using an Antivirus to combat such infections.
Through this article, we tried to explain to you how to restore Windows to a previous date. We also covered all the crucial aspects related to System Restore in the article and explained the method to perform system restores for Windows 10, 8 & 7. If you still face any problems in performing System Restore in your PC or you need any help regarding System restore for your computer, feel free to Ask an Expert.